GoMax Solutions allows Agents to import other contact lists (such as Outlook address books) into their CRM’s as long as the file is a csv format. Please note that all contacts imported this way are defaulted to “No Consent” to comply with the Canadian Anti Spam Legislation. (Read more below)
Export contacts
You can export contacts to a file that can then be imported into other applications, such as your GoMax Solutions CRM.
The export file format needed for your import is a comma separated value (CSV) file.
In Outlook:
Click the File tab.
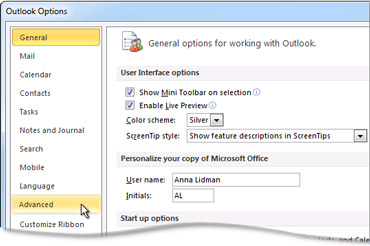
Click Options.
Click Advanced.
Under Export, click Export.

- In the Import and Export Wizard, click Export to a file, and then click Next.
- Under Create a file of type, click the type of export that you want, and then click Next.
The most common is Comma Separated Values (Windows), also known as a CSV file.
- Under Select folder to export from, select the contact folder that you want to export, and then click Next.
NOTE: You can only export one folder at a time.
- Under Save exported file as, click Browse, select a destination folder, and in the File name box, type a name for the file.
- Click OK.
- In the Export to a File dialog box, click Next.
- Click Finish.Applies To: Outlook 2010
IMPORT INTO GOMAX:
You must ensure that your CSV file is clean, rid of duplicates and contacts without names. Each piece of information MUST be in their own column on your spreadsheet. I.E. First name / last name / email address etc. We have also included a .csv template that you may use if you have alternative data that does not exist in Outlook> CRM_data_import_template
Once you are ready for importing, go to your Tools menu and select the Data Import option.
- On the data import screen, browse for your csv file and select open.
- Select ‘CRM Data’ from the ‘Format’ drop down
- Choose your category
- Upload file
- You will be asked to match the custom column fields with the fields found in GoMax to ensure we are importing the data in to the correct fields in Gomax. Do not skip this step! Select from the drop down menus to force match the fields. Once you are happy with this, continue on with importing as normal.

IMPORTANT NOTE:
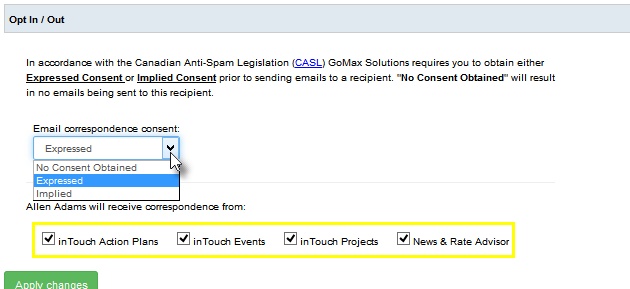
All contacts imported or manually added into GoMax Solutions through this method (or any other random CSV file that is not from Filogix) will have their email/communications consent defaulted to “No Consent” as per the CASL legislation.
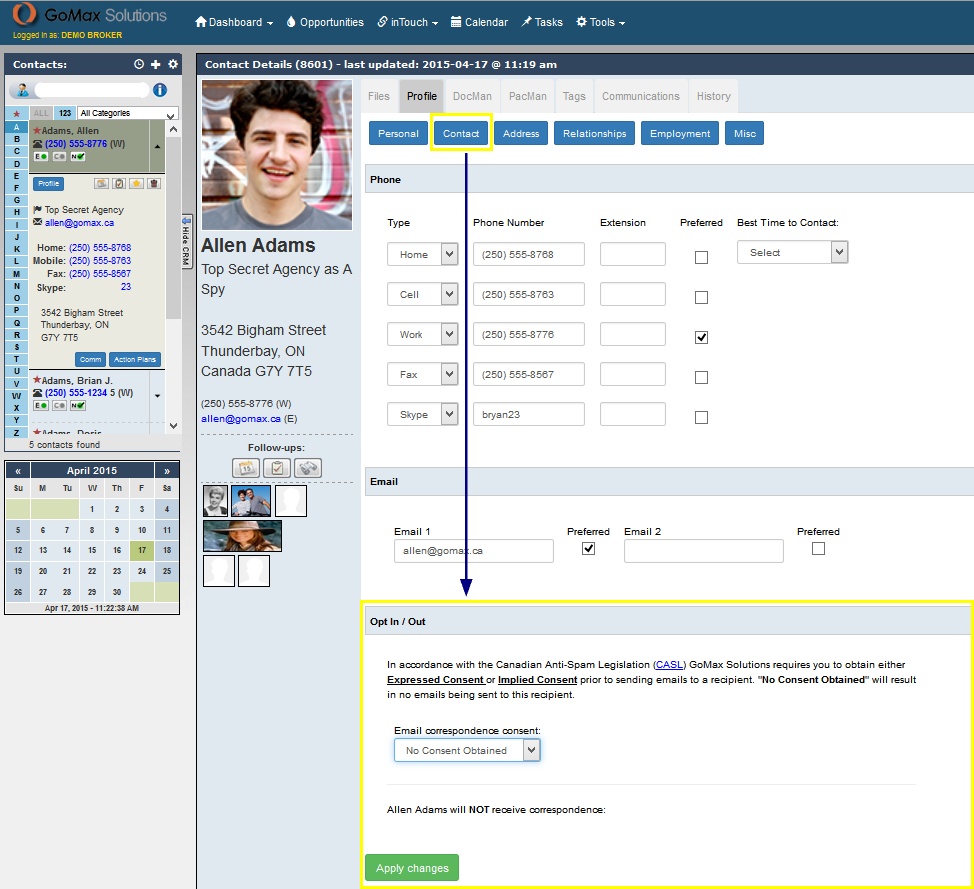
To change this setting go to the clients Profile > Contact tab > and set the consent level to match your written or verbal consent that your contact has provided to you > Apply Changes